Introduction
Let me take you back for a moment. Picture a Saturday morning in suburban America—say, in a friendly neighborhood in the Midwest or the suburbs of Los Angeles—where a young couple, let’s call them Sarah and Matt, are moving into their first home. They’re excited. They’ve got boxes piled high, a hand-me-down couch from Matt’s college days, a lampshade that’s seen better years, and a budget that’s… modest at best.
What Sarah and Matt want—to create a living room that doesn’t look like the “just-got-in-on-sale” version of everything, but rather something that whispers “elegant, considered, elevated,” even though they’re not spending designer-level dollars. Sound familiar? Because for many of us across the USA, that’s exactly the scenario: love where you live, but don’t have the budget of a celebrity interior designer.
Here’s the good news: you can make your living room look like it cost much more than it did. With thoughtful decisions, a bit of strategic planning, and a story-told approach (yes—that means you get to write a little narrative with your space), you’ll walk in and guest say “Wow—this feels so pulled together,” and you’ll smile knowing it didn’t break the bank.
In this article, we’re going to follow Sarah and Matt as they make 11 simple, effective interior design moves that transform their living room—and how you can replicate those same moves in your home. Each tip comes with the subtle narrative of how it played out in their space. Invite yourself into that story, and imagine how it would play out in your own living room.
Ready? Let’s begin.
1. Start With the Story: Choose Your Visual & Emotional Tone
When Sarah and Matt began, they sat down one evening with pizza and iced tea and asked themselves: “How do we want to feel in this room?” Was it relaxed-and-cozy, modern-and-sleek, traditional-and-warm? They realized they loved the idea of “modern comfort” — clean lines, neutral palette, touches of texture, and a space that felt calm after a long day.
That first decision—defining your emotional tone—is often overlooked. But without it, you’ll end up shopping corners, buying mismatched pieces, and your room will feel inconsistent and “thrown together.” Research from designer-advice sites confirms that a consistent palette and style direction immediately boost the perceived “quality” of a space. Better Homes & Gardens+2Decorilla+2
How to apply this:
-
Write down 2–3 adjectives you want your space to embody (e.g., sophisticated + relaxed, minimal + inviting).
-
Pick a style anchor (modern, transitional, coastal, mid-century-inspired).
-
Use these as your guiding star when selecting pieces, finishes, and colors.
In our story: Once they locked on “modern comfort,” Sarah and Matt avoided anything that screamed “cheap trend” and instead looked for timeless pieces they could adapt or accessorize.
2. Clear the Canvas: Declutter & Rearrange Before Buying
On moving day, Sarah and Matt had stuff everywhere—boxes, papers, old furniture. But before going out and buying new, they cleared out what they didn’t need. They kept only what they truly loved or used. Then they rearranged the furniture—moving the couch away from the wall, placing chairs to encourage conversation, and creating a flow.
Why does this matter? Because clutter and bad layout instantly cheapen a space. By rearranging first, you may discover you don’t need to spend much at all to elevate your space. Many design blogs emphasize that decluttering and thoughtful layout are among the most budget-friendly “upgrades” you can make. Decorilla+1
How to apply this:
-
Remove everything from surfaces; only keep a few favorites on display.
-
Move your major pieces (sofa, chairs) into positions that encourage use and conversation.
-
Create zones: e.g., a reading nook, a media viewing area.
-
Live with that layout for a week before buying anything new.
In the story: Sarah realized that their second-hand coffee table pushed too far into a walk-way. Moving it back freed space, made the room feel larger, and they didn’t even realize they had saved money by not replacing it immediately.
3. Select a Thoughtful Color Palette — and Stick to 3-4 Colors
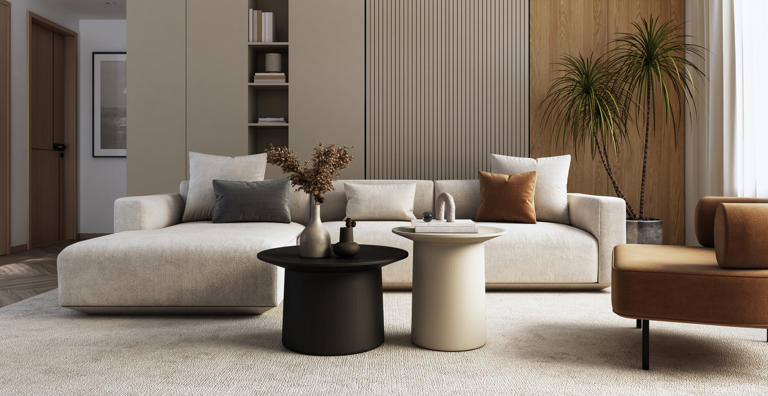
One of the biggest “luxury” tricks: coordinated color. Sarah and Matt chose three core colors: a warm off-white for walls, a charcoal gray for accent furniture, and a muted olive green. Then they added metallics (brass) in small touches. That’s it. Everything else had to fit within that palette.
Designer guides repeatedly show that when a space uses a cohesive palette, it instantly reads as higher end. HGTV+1
How to apply this:
-
Choose your wall color (neutral or muted tone).
-
Select one contrast color (for one major piece or accent).
-
Choose one metallic or texture accent (brass, matte black, antique nickel).
-
Limit other colors to 1-2 small pops (e.g., in throw pillows or art).
-
Stick to this palette when choosing new accessories or furniture, including second-hand or budget pieces—you’ll save money by not chasing too many different styles.
In the story: They bought an olive-green accent chair from a clearance sale, and instead of getting more “colorful” pillows, they swapped in brass-framed mirrors and charcoal gray throws to stay within the palette. It looked intentional.
4. Invest Where It Counts — and Save Elsewhere
Sarah and Matt had limited funds. They decided early on: the sofa gets a little more budget, because it’s used daily; accessories (rugs, pillows, art) will be more modest. That way they get maximum “luxury feel” from the biggest decision, and budget-friendly for the rest.
This is exactly what many interior pros recommend: identify the “investment piece,” then balance with less expensive complimenting items. Homes and Gardens+1
How to apply this:
-
Determine which piece you’ll invest in (sofa, large rug, media console).
-
Allocate, say, 40-50% of redesign budget there.
-
For other elements (throws, accent chairs, small tables, décor), look for budget finds, thrift stores, or DIY.
-
Resist the temptation to spend “a little more” on everything—better to have one high-quality piece and many lower-cost supporting items than everything mid-cheap.
In the story: They splurged on a charcoal gray sofa with a good frame. For the rug, they chose a budget-friendly version that still fit the palette, and even found a side table at a local thrift store which they refinished themselves. End result: The sofa “reads” luxury; the supporting pieces hold up the lineage.
5. Layer Texture & Materials for Richness
A big secret of high-end look: texture. Sarah and Matt added a velvet cushion on the sofa, a boucle-style throw on the accent chair, a matte brass floor lamp, and a sisal-style rug underfoot. They didn’t go overboard; just enough to give richness and depth.
Design advice confirms this: layering textures gives a space that “feels” rich—even when the price point is modest. The Spruce+1
How to apply this:
-
Start with your large surfaces: sofa fabric, rug material, flooring.
-
Add 1–2 medium textures: throw blanket, curtain fabric, side-table finish.
-
Add 1–2 accent textures: decorative pillow fabric, plant leaf texture, metallic finish.
-
Keep the pattern minimal (so texture does the work).
-
Swap one texture for another seasonally (cheaper than replacing whole furniture).
In the story: They didn’t buy a “boutique designer” fabric for the sofa. Instead they kept that uniform, but swapped in a high-pile throw from a discount retailer and a velvet cushion that looked like a designer piece. Guests asked, “Where did you get that cushion?” and they smiled.
6. Use Lighting To Elevate Mood & Scale
In their Saturday morning coffee session, Sarah pointed at the overhead fluorescent fixture and said: “We have to do something about that.” So they changed the bulb to a warm 2700K LED, added a tall brass floor lamp behind the sofa, and placed a table lamp on the side console. The effect: a warm layered glow, fewer harsh shadows, and the room instantly felt cozier and more considered.
As many design-sources note: proper lighting, especially layered lighting (ambient + task + accent), can transform a space dramatically on a modest budget. HGTV+1
How to apply this:
-
Replace standard overhead fixture if it’s basic or outdated—choose something with a bit of “design detail.”
-
Use warm-tone bulbs (2700-3000K) for a richer feel.
-
Add two other lamps: e.g., floor lamp and table lamp.
-
Whenever possible, use dimmer switches (or plug in lamps with smart bulbs).
-
Consider where shadows fall; create light above, beside seating areas, and highlighting wall art.
In the story: With the new floor lamp behind the sofa, the accent wall (with art) lit softly. The table lamp on the console added a “reading corner” vibe. That one change of lighting cost <$150 (fixture + lamp) but made the room feel custom.
7. Scale Matters: Use Right-Sized Rug & Furniture Layout
One of the smartest things they did: they measured the room and bought a rug that was large enough so the front legs of the sofa and chairs would sit on it. Why? Because when rugs are too small, the room fragments, and it looks cheap. Many design guides say: When in doubt, go bigger on the rug. DIY Playbook+1
How to apply this:
-
Measure your seating zone: sofa + chairs + coffee table. Choose a rug that covers that area, if possible.
-
Avoid tiny rugs under coffee tables with nothing else on it.
-
Make sure there is walking space (~18–24 inches) around furniture so the room flows.
-
Don’t crowd or overfill; empty space helps luxury feel.
In the story: They selected a 9×12 ft rug instead of the 6×9 they initially considered. It made the seating area defined, and guests said the room felt larger, not packed. It was a modest upgrade (~$300), but looked more intentional.
8. Finish Strong: Window Treatments, Hardware, Details
Sarah admitted—she didn’t expect the small details to make such a big impact. They swapped out builder-grade blinds for floor-length curtains in a neutral linen-look fabric. They also changed basic white door knobs and outlets in the living room to matte black finish versions. These little finishes made the larger pieces “sing”.
According to many experts, finishing details like switches, door hardware, and drapery can elevate a space drastically. Woman & Home+1
How to apply this:
-
Choose curtains that reach the floor (even if you don’t have tall ceilings)—it adds height.
-
Replace visible hardware (door knobs, drawer pulls) with simpler, more refined versions (brass, black matte).
-
Ensure your outlets & switch plates match or complement your décor (not cheap-white plastic).
-
Add a decorative mirror or art piece above a console to finish the wall.
In the story: The matte black switch plates made the wall feel like it had design intention. That alone cost <$50 total, but they commented that it “pulled everything together.”
9. Choose One Statement Piece & Let the Rest Support It
In their living room story, Sarah and Matt chose the olive-green accent chair as their statement piece. Once that was chosen, the sofa, rug, and other accessories followed. Having one piece that “makes the eye stop” gives a designer feel; everything else supports it rather than competes.
Research backs this: a standout piece combined with supporting elements makes a room feel intentional and curated. Better Homes & Gardens
How to apply this:
-
Pick the piece you’ll speak to: chair, coffee table, lighting fixture, wall art.
-
Let that piece define either color, form, or material.
-
Ensure other elements tie into that subtly (echo the color in a pillow, mirror the metal).
-
Resist buying two statement pieces in the same room—then they fight each other.
In the story: The green chair gave personality. The brass lamp echoed the metal accent. The olive tone showed up in a pillow. Everything felt cohesive.
10. Bring Nature and “Real Life Lived In” Touches
A home that looks perfect often instead looks staged. Sarah and Matt wanted “luxury lived in”—so they added plants, textured throws, a stack of meaningful books, and a tray with a simple candle and fresh branches. They avoided the cold showroom look.
This softens the room, adds warmth, and gives a sense of “someone lives here and cares.” Designers say that real natural elements and personal touches contribute to the high-end feel. Better Homes & Gardens+1
How to apply this:
-
Add a real (or high-quality faux) plant in a corner or by a window.
-
Use a decorative tray on the coffee table rather than many scattered items.
-
Display 2–3 meaningful items or art pieces—not a clutter of stuff.
-
Choose one throw blanket draped over a chair or sofa (not folded perfectly) for an effortless look.
-
Use fresh or faux small stems/branches in a vase.
In the story: They chose a tall indoor plant by the media console, and a low wooden tray with a candle and a small stack of books. Suddenly the room felt warm, lived-in, and “custom”, rather than “off the shelf”.
11. Keep it Flexible: Switch Out Accessories & Focus On Routine Updates
Finally, Sarah and Matt committed to a philosophy: the big-ticket items (sofa, rug, accent chair) stay for many years. But accessorie—pillows, throws, small tables, art—can be swapped easily. This gives longevity and flexibility. They kept their makeover to a budget, but allowed for seasonal refreshes.
This is a key strategy to make luxury feel ongoing and sustainable. Many design pros say this “tiered refresh” approach is smart for budget-conscious homeowners. Homes and Gardens+1
How to apply this:
-
Use budget for big pieces now; don’t chase trends for large furniture.
-
Every 18–24 months, refresh small accessories (pillows, art, throw).
-
Think of accessories as “capsule wardrobe” for the room.
-
Keep the core furniture neutral and timeless; use color/texture to change look.
In the story: One year in, they swapped throw pillows from olive/charcoal to muted blush/charcoal for a seasonal shift. The room felt new, without spending thousands.
Final Walk-Through: How All 11 Tips Came Together in Their Space
Sarah and Matt’s living room started as a blank slate with an old sofa, basic light fixture, and zero sense of cohesion. After applying these 11 steps:
-
Emotional tone defined: modern comfort.
-
Decluttered and rearranged for flow.
-
Color palette chosen (off-white + charcoal + olive + brass).
-
Invested wisely (sofa) and saved smartly (rug, side table).
-
Layered textures: velvet cushion, boucle throw, brass lamp, sisal‐style rug.
-
Upgraded lighting: new overhead fixture + floor lamp + table lamp + warm bulbs.
-
Chose rug size carefully; furniture layout considered scale.
-
Finished small details: full-length curtains, matte black hardware and switches.
-
One statement piece: olive accent chair; rest supported it.
-
Added nature/personal touches: plant, tray, books, throw.
-
Plan for flexible accessory swaps, core pieces long-lasting.
Guest after guest walked in and said it looked like they spent a lot more than they did. And in our story, Sarah and Matt felt proud—not because the room screamed “look-at-me luxury,” but because it felt intentional, high-quality, and deeply them.
FAQ Section
Q1: I’m living in a rental (USA) and can’t paint walls or change hardware easily. Can these tips still work?
Yes! Many of the tips apply regardless of ownership status. For example: you can rearrange furniture, clear clutter, choose a statement piece, layer textures, add floor-length curtains (tension rod if allowed), and accessorize. Use removable hardware or peel-and-stick switch plate covers (if allowed) or focus on lighting, rugs, and decor.
Q2: What budget range are we talking about for this kind of transformation?
It really depends on your region in the USA and how much you already have. But the key is relative budget. If you invest more on one piece (the sofa) and keep supporting pieces modest, you can often make a significant difference for 20-40% less than a full designer redesign. Many design articles show that layered budget changes (texture, light, color) add up to big visual impact. Chatfield Court+1
Q3: How do I know which piece to splurge on?
Look at what you use most often and what sets the tone of the room. For example: the sofa (daily use), the large rug (defines space), a statement lighting fixture (heavily visible). Then allocate more of your budget there. Everything else (throw pillows, side tables, small accessories) can be less costly. Tools like “tiered budget” are recommended by pros. Homes and Gardens
Q4: How do I keep the “luxury feel” over time without constant spending?
Maintain your core pieces (sofa, rug) for many years. Revive the look by swapping accessories seasonally, rotating throws/pillows, refreshing wall art or plants, and keeping the room clean and uncluttered. Use the “capsule” approach for your living room decor.
Q5: What if my living room is very small? Does “looking expensive” mean it needs to look big?
Not at all. A small living room can look luxurious by focusing on scale, coherence, and quality rather than size. Use a rug that covers most of the seating area, use fewer but better pieces, avoid clutter, and use large windows/tall curtains to create verticality. The “expensive” feel is about proportion, materials, and curation—not square footage.
Closing Thoughts
In closing, remember: making your living room look expensive doesn’t mean buying everything expensive. It means making thoughtful choices, using your budget strategically, telling a story with your space (just like Sarah and Matt did), and layering details that read “designed” rather than “rushed.”
If you apply these 11 tips step by step, your living room will become a space where you want to linger. Where friends will say, “This feels great,” and you’ll say, “Thanks—I did it on a budget,” with a little secret smile.
Would you like a printable version of these tips or perhaps a checklist tailored for your specific living-room size and budget in the USA? I can help put that together.