
Your water heater is one of the hardest-working appliances in your home, silently providing comfort for showers, laundry, and dishes. Yet, it’s also one of the most neglected. Most of us only think about it when the hot water suddenly runs out. But ignoring this essential appliance can lead to higher energy bills, premature failure, and costly water damage.
The good news? A simple, annual maintenance task can dramatically extend its life and improve its efficiency: draining the tank to remove sediment. This one-hour job can save you from a $1,500+ replacement and restore your hot water capacity. Here’s your complete guide to doing it safely and effectively.
Why Draining Your Water Heater is Non-Negotiable
Over time, minerals and debris naturally present in your water—like calcium carbonate (lime), sand, and rust—settle at the bottom of your tank. This accumulation of sediment is the enemy of your water heater, causing a cascade of problems:
-
Reduced Efficiency: The sediment layer acts as a barrier between the heating element (or gas burner) and the water. This forces your heater to work harder and longer to heat the same amount of water, directly increasing your monthly gas or electric bill.
-
Premature Failure: The constant overheating of the sediment layer can cause the steel tank bottom to crack and corrode, leading to leaks. Replacing a water heater is a major, unexpected expense.
-
Loss of Hot Water Capacity: The sediment takes up space that should be holding hot water. This is why you might find your hot water running out faster than it used to.
-
Noisy Operation: Popping, rumbling, or knocking sounds are a classic sign of a sediment-filled tank. As water bubbles up through the sediment layer, it creates these noises, indicating it’s long past time for a flush.
For most households, an annual flush is sufficient. If you have hard water, consider doing it every six months.
Step-by-Step Guide: How to Drain Your Traditional Tank Water Heater
Safety First! Always prioritize safety. The water in your tank can be scalding hot. Allow plenty of time for the tank to cool before beginning.
What You’ll Need:
-
A standard garden hose (long enough to reach from the heater to a drain or outside)
-
A large bucket or a flat pan
-
A pair of channel-lock pliers or a screwdriver (depending on your valve type)
-
Work gloves and safety glasses
-
Old towels for spills
The Process:
-
Turn Off the Power & Water:
-
For Electric Heaters: Go to your circuit breaker and switch off the circuit dedicated to the water heater. This is critical to prevent the heating elements from burning out when the tank is empty.
-
For Gas Heaters: Turn the gas control valve to the “Pilot” setting.
-
For All Types: Shut off the cold water supply valve located at the top of the water heater.
-
-
Let the Water Cool: Wait at least 5-6 hours, or ideally overnight, for the water in the tank to cool to a safe temperature.
-
Relieve Pressure and Open a Faucet:
-
Go to a nearby bathroom or kitchen sink and turn the hot water faucet on fully. This prevents a vacuum from forming in the lines, allowing the tank to drain smoothly.
-
To relieve pressure in the tank, carefully lift the lever on the Temperature and Pressure Relief (TPR) valve, usually located on the side or top of the tank.
-
-
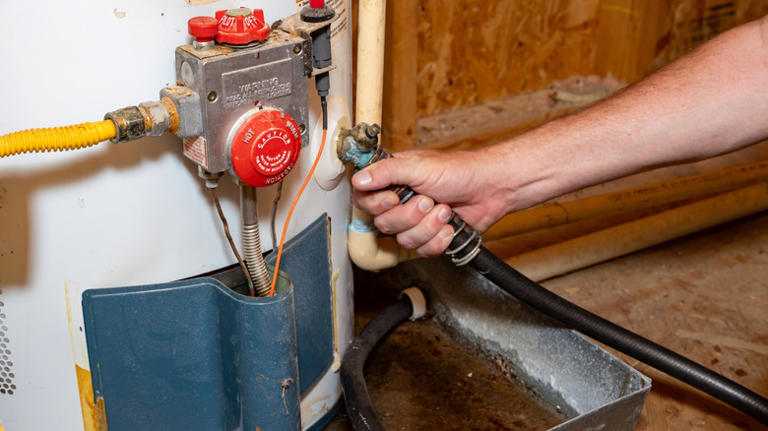
Connect the Hose and Drain:
-
Attach your garden hose to the drain valve spigot at the base of the tank. Run the other end to a floor drain, a sump pump, or outside away from your home’s foundation. (Tip: If draining outside, be mindful of the hot water on your plants or lawn.)
-
Place your bucket under the drain valve connection to catch any initial drips.
-
Carefully open the drain valve using your pliers or screwdriver. Expect the water to be hot and potentially discolored from sediment.
-
-
Flush the Tank:
-
Allow the tank to drain completely. For a more thorough cleaning, briefly turn the cold water supply back on for 30 seconds to stir up the remaining sediment, then shut it off and let it drain again. Repeat until the water runs clear.
-
-
Refill and Restore Power:
-
Close the drain valve tightly and remove the hose.
-
Turn the cold water supply valve back on.
-
Keep that nearby hot water faucet open. You will hear sputtering as air is purged from the system. Once a steady stream of water flows from the faucet, turn it off.
-
Now, you can restore power:
-
For Electric: Turn the circuit breaker back on.
-
For Gas: Turn the gas control valve back to “On.”
-
-
Allow the tank about 40-60 minutes to heat a full tank of water before use.
-
What About Tankless Water Heaters?
Tankless models also require annual descaling to remove mineral buildup, but the process is different. You will need a tankless water heater flushing kit, which includes a submersible pump and hoses.
The general process involves:
-
Shutting off power and water.
-
Connecting the flush kit to the service valves on the unit.
-
Circulating a descaling solution (like white vinegar) through the heat exchanger for 45-60 minutes using the pump.
-
Flushing the system with clean water before restoring power and water.
When to Call a Professional
While DIY-friendly, there are times to call a licensed plumber:
-
The Drain Valve is Stuck or Leaks: Forcing a corroded valve can break it, causing a major leak.
-
The Water Heater is Very Old (10+ years): If it has never been maintained, draining it could dislodge sediment and reveal hidden corrosion, causing a new leak.
-
You See Signs of a Major Leak: Any signs of rust or water pooling around the base of the tank are red flags.
-
You’re Simply Not Comfortable: There’s no shame in calling a pro for peace of mind.
The Bottom Line
Spending one hour a year to drain your water heater is one of the most cost-effective forms of home maintenance you can perform. It protects your investment, saves you money on energy bills, and ensures you’re never left shivering in a cold shower.
Frequently Asked Questions (FAQs)
Q1: I drained my water heater, and now the hot water is discolored. Is this normal?
Yes, this is normal for the first use after draining. The dislodged sediment has entered the water lines. Simply run the hot water at a tub or laundry sink (where the discoloration won’t stain) for a few minutes until it runs clear.
Q2: My drain valve only drips; it won’t produce a steady stream. What’s wrong?
This usually means the valve is clogged with sediment. Very carefully, you can try to insert a thin, stiff wire (like a straightened paperclip) into the valve opening to clear the blockage. If it remains clogged or starts to leak, it’s time to call a professional to replace the valve.
Q3: Can I drain my water heater without turning off the power?
No. This is a critical safety step. For electric heaters, the heating elements will be exposed and burn out if the tank is empty. For gas heaters, while the risk is slightly different, it’s a standard safety procedure to prevent the system from firing while you’re working on it.
Q4: How do I know if my water heater is beyond maintenance and needs replacement?
Key signs include:
-
Rusty water that doesn’t clear after flushing.
-
A persistent leak from the tank itself (not a valve).
-
Loud banging or rumbling that continues after maintenance.
-
Insufficient hot water even after flushing, indicating a failing heating element or a heavily sediment-filled tank.
Q5: What if I have a water softener? Do I still need to drain annually?
Yes, but you may be able to extend the interval to every 18-24 months. While a softener removes calcium and magnesium (which cause scale), it doesn’t remove all sediment, like rust or sand, that can still accumulate.